(头条、微医)Async/Await 如何通过同步的方式实现异步
个人题解
- 是promise的语法糖,async 返回的是promise,await 后面的语句相当于放在前一个promise的then 方法内.
- 个人猜测是这样
最高赞题解
本质是单向链表吧
Async/Await 如何通过同步的方式实现异步
作为前端人员要回答这个问题,需要了解这三个知识点:
- 同步
- 异步
- Async/Await
首先,js 是单线程的(重复三遍),所谓单线程,
通俗的讲就是,一根筋(比喻有点过分,哈哈)执行代码是一行一行的往下走(即所谓的同步),
如果上面的没执行完,就痴痴的等着(是不是很像恋爱中在路边等她/他的你,假装 new 了个对象,啊哈哈哈,调皮一下很开心),
还是举个 🌰 吧:上面仅仅是一个 for 循环,而在实际应用中,会有大量的网络请求,它的响应时间是不确定的,这种情况下也要痴痴的等么?显然是不行的,因而 js 设计了异步,即 发起网络请求(诸如 IO 操作,定时器),由于需要等服务器响应,就先不理会,而是去做其他的事儿,等请求返回了结果的时候再说(即异步)。1
2
3
4
5
6
7
8
9
10
11
12
13// chrome 75
function test() {
let d = Date.now();
for (let i = 0; i < 1e8; i++) {}
console.log(Date.now() - d); // 62ms左右
}
function test1() {
let d = Date.now();
console.log(Date.now() - d); // 0
}
test();
test1();
那么如何实现异步呢?其实我们平时已经在大量使用了,那就是 callback,例如:success 作为函数传递过去并不会立即执行,而是等请求成功了才执行,即回调函数(callback)1
2
3
4
5
6$.ajax({
url: 'http://xxx',
success: function(res) {
console.log(res);
},
});和网络请求类似,等到 IO 操作有了结果(无论成功与否)才会执行第三个参数:(err)=>{}1
2
3
4
5const fs = require('fs');
fs.rename('旧文件.txt', '新文件.txt', err => {
if (err) throw err;
console.log('重命名完成');
});
从上面我们就可以看出,实现异步的核心就是回调钩子,将 cb 作为参数传递给异步执行函数,当有了结果后在触发 cb。想了解更多,去看看 event-loop 机制吧。
至于 async/await 是如何出现的呢,在 es6 之前,大多 js 数项目中会有类似这样的代码:
1 | ajax1(url, () => { |
这种函数嵌套,大量的回调函数,使代码阅读起来晦涩难懂,不直观,形象的称之为回调地狱(callback hell),所以为了在写法上能更通俗一点,es6+陆续出现了 Promise、Generator、Async/await,力求在写法上简洁明了,可读性强。
=========================我是分割线==========================
以上只是铺垫,下面在进入正题 👇,开始说道说道主角:async/await
=========================我是分割线==========================
async/await 是参照 Generator 封装的一套异步处理方案,可以理解为 Generator 的语法糖,
所以了解 async/await 就不得不讲一讲 Generator,
而 Generator 又依赖于迭代器Iterator,
所以就得先讲一讲 Iterator,
而 Iterator 的思想呢又来源于单向链表,
终于找到源头了:单向链表
1. 单向链表
wiki:链表(Linked list)是一种常见的基础数据结构,是一种线性表,但是并不会按线性的顺序储存数据,而是在每一个节点里存到下一个节点的指针(Pointer)。由于不必须按顺序储存,链表在插入的时候可以达到 o(1)的复杂度,比另一种线性表顺序表快得多,但是查找一个节点或者访问特定编号的节点则需要 o(n)的时间,而顺序表响应的时间复杂度分别是 o(logn)和 o(1)。
总结一下链表优点:
无需预先分配内存
插入/删除节点不影响其他节点,效率高(典型的例子:git commit、dom 操作)
单向链表:是链表中最简单的一种,它包含两个域,一个信息域和一个指针域。这个链接指向列表中的下一个节点,而最后一个节点则指向一个空值。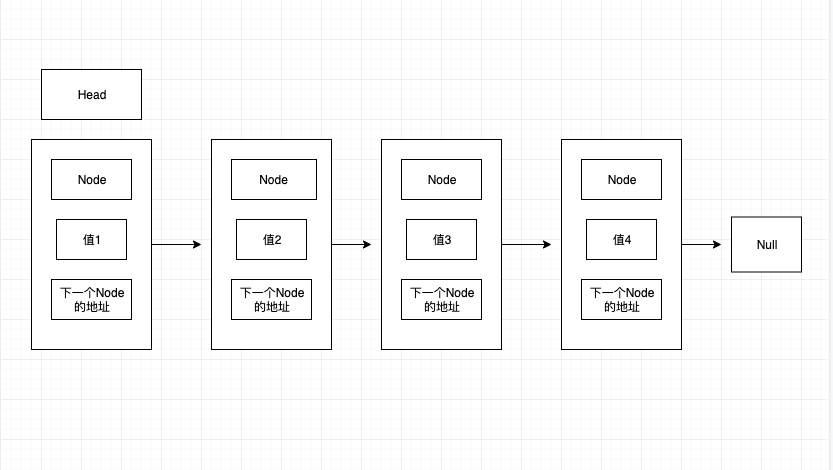
一个单向链表包含两个值: 当前节点的值和一个指向下一个节点的链接
单链特点:节点的链接方向是单向的;相对于数组来说,单链表的的随机访问速度较慢,但是单链表删除/添加数据的效率很高。
理解 js 原型链/作用域链的话,理解这个很容易,他们是相通的。编程语言中,数组的长度时固定的,所以数组中的增加和删除比较麻烦,需要频繁的移动数组中的其他元素,而 js 作为一门动态语言,数组本质是一个类似数组的对象,是动态的,不需要预先分配内存
那么如何设计一个单向链表呢?这个取决于我们需要哪些操作,通常有:
- append(element):追加节点
- insert(element,index):在索引位置插入节点
- remove(element):删除第一个匹配到的节点
- removeAt(index):删除指定索引节点
- removeAll(element):删除所有匹配的节点
- get(index):获取指定索引的节点信息
- set(element,index):修改指定索引的节点值
- indexOf(element):获取某节点的索引位置
- clear():清除所有节点
- length():返回节点长度
- printf():打印节点信息
看到这些方法是不是有些许熟悉,当你用原生 js 或 jq 时常会用上面类似的方法,现在根据上面列出的方法进行实现一个单向链:1
2
3
4
5
6
7
8
9
10
11
12
13
14
15
16
17
18
19
20
21
22
23
24
25
26
27
28
29
30
31
32
33
34
35
36
37
38
39
40
41
42
43
44
45
46
47
48
49
50
51
52
53
54
55
56
57
58
59
60
61
62
63
64
65
66
67
68
69
70
71
72
73
74
75
76
77
78
79
80
81
82
83
84
85
86
87
88
89
90
91
92
93
94
95
96
97
98
99
100
101
102
103
104
105
106
107
108
109
110
111
112
113
114
115
116
117
118
119
120
121
122
123
124
125
126
127
128
129
130
131
132
133
134
135
136
137
138
139
140
141
142
143
144
145
146
147
148
149
150
151
152
153
154
155
156
157
158
159
160
161
162
163
164
165
166
167
168
169
170
171
172
173
174
175
176
177
178
179
180
181
182
183
184
185
186
187
188
189
190
191
192
193// 节点模型
class LinkNode {
constructor(element, next) {
this.element = element;
this.next = next;
}
}
class LinkedList {
constructor() {
this._head = null;
this._size = 0;
this._errorBoundary = this._errorBoundary.bind(this);
this._getNodeByIndex = this._getNodeByIndex.bind(this);
this.append = this.append.bind(this);
this.insert = this.insert.bind(this);
this.remove = this.remove.bind(this);
this.removeAt = this.removeAt.bind(this);
this.removeAll = this.removeAll.bind(this);
this.getElement = this.getElement.bind(this);
this.setIndex = this.setIndex.bind(this);
this.indexOf = this.indexOf.bind(this);
this.clear = this.clear.bind(this);
this.length = this.length.bind(this);
this.printf = this.printf.bind(this);
}
// 边界检验
_errorBoundary(index) {
if (index < 0 || index >= this._size) {
throw `超出边界(${0}~${this._size}),目标位置${index}不存在!`;
}
}
// 根据索引获取目标对象
_getNodeByIndex(index) {
this._errorBoundary(index);
let obj = this._head;
for (let i = 0; i < index; i++) {
obj = obj.next;
}
return obj;
}
// 追加节点
append(element) {
if (this._size === 0) {
this._head = new LinkNode(element, null);
} else {
let obj = this._getNodeByIndex(this._size - 1);
obj.next = new LinkNode(element, null);
}
this._size++;
}
// 在索引位置插入节点
insert(element, index) {
if (index === 0) {
this._head = new LinkNode(element, this._head);
} else {
let obj = this._getNodeByIndex(index - 1);
obj.next = new LinkNode(element, obj.next);
}
this._size++;
}
// 删除第一个匹配到的节点
remove(element) {
if (this._size < 1) return null;
if (this._head.element == element) {
this._head.element = this._head.next;
this._size--;
return element;
} else {
let temp = this._head;
while (temp.next) {
if (temp.next.element == element) {
temp.next = temp.next.next;
this._size--;
return element;
} else {
temp = temp.next;
}
}
}
return null;
}
// 删除指定索引节点
removeAt(index) {
this._errorBoundary(index);
let element = null;
if (index === 0) {
element = this._head.element;
this._head = this._head.next;
} else {
let prev = this._getNodeByIndex(index - 1);
element = prev.next.element;
prev.next = prev.next.next;
}
this._size--;
return element;
}
// 删除所有匹配的节点
removeAll(element) {
// 创建虚拟头节点,
let v_head = new LinkNode(null, this._head);
let tempNode = v_head;
// let tempEle = null;
while (tempNode.next) {
if (tempNode.next.element == element) {
tempNode.next = tempNode.next.next;
this._size--;
// tempEle = element;
} else {
tempNode = tempNode.next;
}
}
this._head = v_head.next;
}
// 获取指定索引的节点信息
getElement(index) {
return this._getNodeByIndex(index).element;
}
// 修改指定索引的节点值
setIndex(element, index) {
this._errorBoundary(index);
let obj = this._getNodeByIndex(index);
obj.element = element;
}
// 获取某节点的索引位置
indexOf(element) {
let obj = this._head;
let index = -1;
for (let i = 0; i < this._size; i++) {
if (obj.element == element) {
index = i;
break;
}
obj = obj.next;
}
return index;
}
// 清除所有节点
clear() {
this._head = null;
this._size = 0;
}
// 返回节点长度
length() {
return this._size;
}
// 打印节点信息
printf() {
let obj = this._head;
const arr = [];
while (obj != null) {
arr.push(obj.element);
obj = obj.next;
}
const str = arr.join('->');
return str || null;
}
}
const obj = new LinkedList();
obj.append(0);
obj.append(1);
obj.append(2);
obj.printf();
// "0->1->2"
obj.insert(3, 3);
obj.printf();
// "0->1->2->3"
obj.remove(3);
obj.printf();
// "0->1->2"
obj.removeAt(0);
obj.printf();
// "1->2"
obj.setIndex(0, 0);
obj.printf();
// "0->2"
obj.indexOf(2);
// 1
obj.length();
// 2
obj.clear();
obj.printf();
// null
通过以上,我假装你明白什么是单向链表,并且能够用代码实现一个单向链表了,下一步开始说一说迭代器 Iterator
2. Iterator
Iterator 翻译过来就是迭代器(遍历器)让我们先来看看它的遍历过程(类似于单向链表):
创建一个指针对象,指向当前数据结构的起始位置
第一次调用指针对象的 next 方法,将指针指向数据结构的第一个成员
第二次调用指针对象的 next 方法,将指针指向数据结构的第二个成员
不断的调用指针对象的 next 方法,直到它指向数据结构的结束位置
一个对象要变成可迭代的,必须实现 @@iterator 方法,即对象(或它原型链上的某个对象)必须有一个名字是 Symbol.iterator 的属性(原生具有该属性的有:字符串、数组、类数组的对象、Set 和 Map):
| 属性 | 值 |
|---|---|
| [Symbol.iterator] | 返回一个对象的无参函数,被返回对象符合迭代器协议 |
当一个对象需要被迭代的时候(比如开始用于一个 for..of 循环中),它的 @@iterator 方法被调用并且无参数,然后返回一个用于在迭代中获得值的迭代器
迭代器协议:产生一个有限或无限序列的值,并且当所有的值都已经被迭代后,就会有一个默认的返回值
当一个对象只有满足下述条件才会被认为是一个迭代器:
它实现了一个 next() 的方法,该方法必须返回一个对象,对象有两个必要的属性:
done(bool)
true:迭代器已经超过了可迭代次数。这种情况下,value 的值可以被省略
如果迭代器可以产生序列中的下一个值,则为 false。这等效于没有指定 done 这个属性
value 迭代器返回的任何 JavaScript 值。done 为 true 时可省略
根据上面的规则,咱们来自定义一个简单的迭代器:
const makeIterator = arr => {
  let nextIndex = 0;
  return {
    next: () =>
      nextIndex < arr.length
        ? { value: arr[nextIndex++], done: false }
        : { value: undefined, done: true },
  };
};
const it = makeIterator(['人月', '神话']);
console.log(it.next()); // { value: "人月", done: false }
console.log(it.next()); // { value: "神话", done: false }
console.log(it.next()); // {value: undefined, done: true }
我们还可以自定义一个可迭代对象:

const myIterable = {};
myIterable[Symbol.iterator] = function*() {
  yield 1;
  yield 2;
  yield 3;
};

for (let value of myIterable) {
  console.log(value);
}
// 1
// 2
// 3

//or

console.log([...myIterable]); // [1, 2, 3]
了解了迭代器,下面可以进一步了解生成器了
3. Generator
Generator:生成器对象是生成器函数(GeneratorFunction)返回的,它符合可迭代协议和迭代器协议,既是迭代器也是可迭代对象,可以调用 next 方法,但它不是函数,更不是构造函数
生成器函数(GeneratorFunction):
function* name([param[, param[, … param]]]) { statements } –>
name:函数名
param:参数
statements:js 语句
调用一个生成器函数并不会马上执行它里面的语句,而是返回一个这个生成器的迭代器对象,当这个迭代器的 next() 方法被首次(后续)调用时,其内的语句会执行到第一个(后续)出现 yield 的位置为止(让执行处于暂停状),yield 后紧跟迭代器要返回的值。或者如果用的是 yield*(多了个星号),则表示将执行权移交给另一个生成器函数(当前生成器暂停执行),调用 next() (再启动)方法时,如果传入了参数,那么这个参数会作为上一条执行的 yield 语句的返回值,例如:
function* another() {
  yield '人月神话';
}
function* gen() {
  yield* another(); // 移交执行权
  const a = yield 'hello';
  const b = yield a; // a='world' 是 next('world') 传参赋值给了上一个 yidle 'hello' 的左值
  yield b; // b=! 是 next('!') 传参赋值给了上一个 yidle a 的左值
}
const g = gen();
g.next(); // {value: "人月神话", done: false}
g.next(); // {value: "hello", done: false}
g.next('world'); // {value: "world", done: false} 将 'world' 赋给上一条 yield 'hello' 的左值,即执行 a='world',
g.next('!'); // {value: "!", done: false} 将 '!' 赋给上一条 yield a 的左值,即执行 b='!',返回 b
g.next(); // {value: undefined, done: false}
看到这里,你可能会问,Generator 和 callback 有啥关系,如何处理异步呢?其实二者没有任何关系,我们只是通过一些方式强行的它们产生了关系,才会有 Generator 处理异步
我们来总结一下 Generator 的本质,暂停,它会让程序执行到指定位置先暂停(yield),然后再启动(next),再暂停(yield),再启动(next),而这个暂停就很容易让它和异步操作产生联系,因为我们在处理异步时:开始异步处理(网络求情、IO 操作),然后暂停一下,等处理完了,再该干嘛干嘛。不过值得注意的是,js 是单线程的(又重复了三遍),异步还是异步,callback 还是 callback,不会因为 Generator 而有任何改变
下面来看看,用 Generator 实现异步:
const promisify = require('util').promisify;
const path = require('path');
const fs = require('fs');
const readFile = promisify(fs.readFile);

const gen = function*() {
  const res1 = yield readFile(path.resolve(__dirname, '../data/a.json'), { encoding: 'utf8' });
  console.log(res1);
  const res2 = yield readFile(path.resolve(__dirname, '../data/b.json'), { encoding: 'utf8' });
  console.log(res2);
};

const g = gen();

const g1 = g.next();
console.log('g1:', g1);

g1.value
  .then(res1 => {
    console.log('res1:', res1);
    const g2 = g.next(res1);
    console.log('g2:', g2);
    g2.value
      .then(res2 => {
        console.log('res2:', res2);
        g.next(res2);
      })
      .catch(err2 => {
        console.log(err2);
      });
  })
  .catch(err1 => {
    console.log(err1);
  });
// g1: { value: Promise { <pending> }, done: false }
// res1: {
//   "a": 1
// }

// {
//   "a": 1
// }

// g2: { value: Promise { <pending> }, done: false }
// res2: {
//   "b": 2
// }

// {
//   "b": 2
// }
以上代码是 Generator 和 callback 结合实现的异步,可以看到,仍然需要手动执行 .then 层层添加回调,但由于 next() 方法返回对象 {value: xxx,done: true/false} 所以我们可以简化它,写一个自动执行器:
const promisify = require('util').promisify;
const path = require('path');
const fs = require('fs');
const readFile = promisify(fs.readFile);

function run(gen) {
  const g = gen();
  function next(data) {
    const res = g.next(data);
    // 深度递归,只要 `Generator` 函数还没执行到最后一步,`next` 函数就调用自身
    if (res.done) return res.value;
    res.value.then(function(data) {
      next(data);
    });
  }
  next();
}
run(function*() {
  const res1 = yield readFile(path.resolve(__dirname, '../data/a.json'), { encoding: 'utf8' });
  console.log(res1);
  // {
  //   "a": 1
  // }
  const res2 = yield readFile(path.resolve(__dirname, '../data/b.json'), { encoding: 'utf8' });
  console.log(res2);
  // {
  //   "b": 2
  // }
});
说了这么多,怎么还没有到 async/await,客官别急,马上来了(其实我已经漏了一些内容没说:Promise 和 callback 的关系,thunk 函数,co 库,感兴趣的可以去 google 一下,ruanyifeng 老师讲的es6 入门非常棒,我时不时的都会去看一看)

4. Async/Await
首先,async/await 是 Generator 的语法糖,上面我是分割线下的第一句已经讲过,先来看一下二者的对比:

// Generator
run(function*() {
  const res1 = yield readFile(path.resolve(__dirname, '../data/a.json'), { encoding: 'utf8' });
  console.log(res1);
  const res2 = yield readFile(path.resolve(__dirname, '../data/b.json'), { encoding: 'utf8' });
  console.log(res2);
});

// async/await
const readFile = async ()=>{
  const res1 = await readFile(path.resolve(__dirname, '../data/a.json'), { encoding: 'utf8' });
  console.log(res1);
  const res2 = await readFile(path.resolve(__dirname, '../data/b.json'), { encoding: 'utf8' });
  console.log(res2);
  return 'done';
}
const res = readFile();
可以看到,async function 代替了 function*,await 代替了 yield,同时也无需自己手写一个自动执行器 run 了
现在再来看看async/await 的特点:
当 await 后面跟的是 Promise 对象时,才会异步执行,其它类型的数据会同步执行
执行 const res = readFile(); 返回的仍然是个 Promise 对象,上面代码中的 return ‘done’; 会直接被下面 then 函数接收到
res.then(data => {
console.log(data); // done
});
啊,终于完了,一个 async-await 连带出来这么多知识点,以后面试被问到它的原理时,希望能够帮助到你